


 School is back in full swing, football season (or as I like to call it tailgating season) is here, the temps are finally starting to drop and we are chomping at the bit to start wearing sweaters and boots...It's Fall Ya'll!!!
But in the Martin household, it isn't Fall until the Fall decorations are out! Both Kipper and I love how the Fall decor makes the house feel extra cozy, but I also love the opportunity to get crafty!
Anyone who has ever purchased floral arrangements for their home knows that you can easily drop quite a bit of cash for the quality and look of arrangement you want. This was something I learned very quickly when Kipper and I got married. I had a vision of what I wanted but had very little budget to achieve it. That was when I started to teach myself how to create the arrangements I wanted and I am so glad I did. (Man Pinterest would have sure been helpful then!) I couldn't even begin to tell you how much money it has saved us over the years, without sacrificing on look.
This year I decided I wanted create a new piece to go on top of our entertainment hutch so I headed to Hobby Lobby one Saturday that they had all their Fall decor and floral 40% off. After 45 minutes of shopping and $21 later I was ready to get started!
Here is everything I had to work with/used:


After playing around with the combination of placement options I decided on which I liked best and attached everything with floral wire. Because the pumpkins were on picks, I was able to forgo hot gluing them and just just the floral wire. I prefer not to have to hot glue anything because it makes it harder to change things out and update arrangements after a few years. So if you are creating something that you want to use for several years, try to forgo the hot glue (even though it is faster) because in the long run you will be able to get more life out of your arrangement!


Here is everything I had to work with/used:

- 2 berry branches that had wired, curly branch pieces on it
- 4 velvet sunflowers
- 1 Fall leaf vine
- 2 small pumpkins
- 2 large, glitter accented pumpkins
- A hand full of thin decorative, glittered branches in both gold and orange
- Floral wire
- Hot glue (which I ended up not using)
- Wire cutters
- Scissors
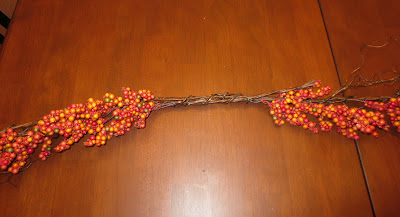
To start, I laid out the berry branches and unwrapped the 1 of the wired, curly branch pieces from each one and set those aside for later.

Next I snipped about 2 1/2 - 3 inches off of each berry branch in order to achieve the right length once assembled for the length of the TV hutch.

After that I used the the wired, curly branch pieces still attached to connect the two berry branches, creating the base for my arrangement.

After getting the base assembled I clipped off 2 berry bunches from each end to use when I built the middle of the arrangement. On these particular branches every other set of berries had the mini bunches split into 2 so you could maximize the fullness, so cutting off 2 on each side didn't make it looked like their were big holes etc.

I set the berry bunches to the side and started pulling the cluster of leaves off the fall leaf vine. Using the floral wire I started filling in around the berry bunches by attaching the leave clusters. In order to have a nice variation of color, I played around with different leaf clusters and locations before actually attaching them.

After adding leaves onto both ends of the base, it was time to start adding some to the center section. Knowing that I would be adding the pumpkins, sunflowers and the berries and wired curly branch that I cut off earlier, I used the leafs to help shape the area so it would look full once everything in place.

After playing around with the combination of placement options I decided on which I liked best and attached everything with floral wire. Because the pumpkins were on picks, I was able to forgo hot gluing them and just just the floral wire. I prefer not to have to hot glue anything because it makes it harder to change things out and update arrangements after a few years. So if you are creating something that you want to use for several years, try to forgo the hot glue (even though it is faster) because in the long run you will be able to get more life out of your arrangement!

Now that all the major assemble was done, it was time to put the arrangement on the hutch for final touches!
Once in place I took both the gold and orange thin, glittered decorative branches and inserted them in to add a little extra fullness and sparkle! This branches are so thin they don't always store well in between years and often break in storage. Because of that I don't even wire them in to arrangements. They are so cheap it is just easier to put new ones in each year!

When it was all said and done, I was really excited with how it turned out! And the fact that is only cost me $21 and a few hours of time made me like it even better! Hopefully this "how to" will inspire you to create your own fall floral creation! Just remember, if you are using the floral wire there is almost no part of an arrangement you can't "undo" or change so through caution to the wind and see what you can come up with!

Now time to light some candles and curl up with a good book and my fur babies! I LOVE FALL!!!!


No comments:
Post a Comment